How to Use the DEI Locking Tie Tool for Exhaust Wraps
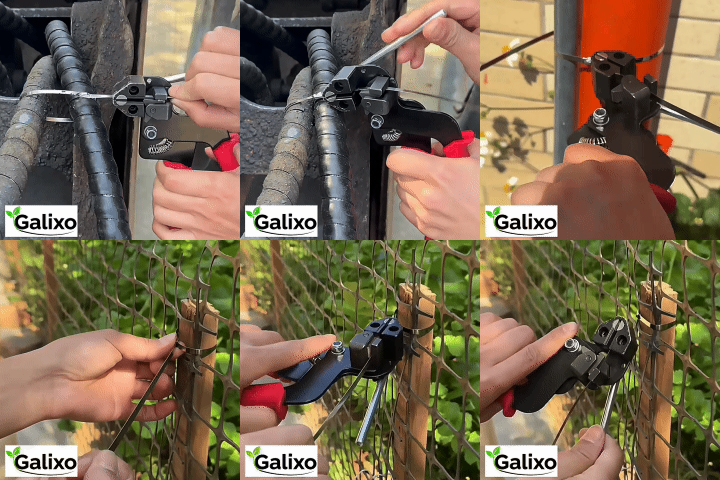
Learning how to use dei locking tie tool properly prevents extreme vehicle exhaust heat from melting low-grade plastic ties while eliminating painful hand lacerations caused by manual steel twisting. This professional mechanical blueprint by Galixo Store provides custom builders and mechanics with an ultimate tensioning guide to secure high-performance header insulation wraps with maximum reliability.

Galixo Automatic Stainless Zip Tie Tool Kit
Professional mechanical fastening solution built for extreme engine bay heat and heavy vibration. Fast one-hand operation, automatic tensioning, and flush cut leaving no dangerous sharp edges.
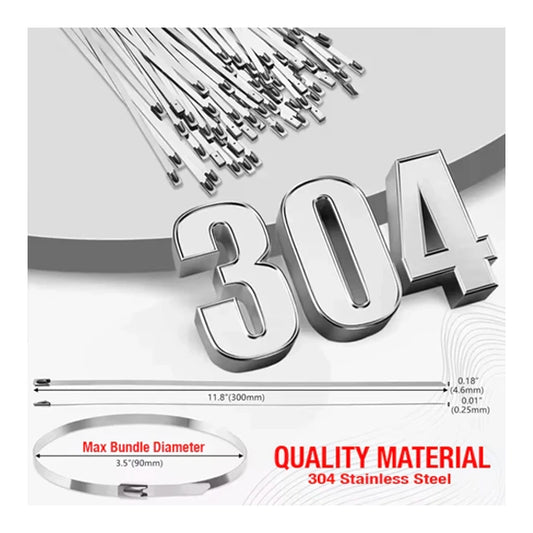
SUPERIOR 304 STEEL DURABILITY
VIEW PRODUCT DETAILSTable of Contents
- 1. Operational Guide: How to Use the DEI Locking Tie Tool for Exhaust Wraps
- 2. Evaluating the Efficiency of Using a Drill Socket with Locking Tie Tools
- 3. DEI Locking Tie Tool vs Heavy Duty Stainless Steel Cable Tie Guns
- 4. Preventing and Troubleshooting Ball Lock Slippage Under Extreme Tension
- 5. Locking Tie Tool Alternatives and High-Tensile Specifications
- Frequently Asked Questions about How to Use DEI Locking Tie Tool (FAQs)
- Elevate Your Mechanical & DIY Garage Durability with Galixo Store Solutions
1. Operational Guide: How to Use the DEI Locking Tie Tool for Exhaust Wraps
Securing volcanic rock basalt or fiberglass insulating wraps on motorcycle headers requires extreme tension to prevent unraveling under thermal shock. Standard pliers often fail to supply the mechanical leverage needed to lock the internal ball bearings of stainless steel bands securely. Before starting this installation procedure, mechanics must gather necessary personal protective equipment including heavy-duty cut-resistant gloves, safety glasses to block loose fibers, and a reliable measuring tape.
Step 1: Preparing and Pre-wetting the Exhaust Wrap
Proper moisture conditioning of traditional fiberglass insulation allows the material to stretch more tightly around the metal curves of motorcycle headers. Moisten the fiberglass wrap slightly with a spray bottle to suppress airborne fibers and increase overall pliability. Avoid soaking basalt-based wraps because excessive moisture can weaken the structural integrity of volcanic rock filaments. Follow these critical action steps during preparation:
- Measure the exact outside diameter of the primary exhaust pipes using a vernier caliper to calculate the required length of wrap material.
- Submerge fiberglass wrap rolls in clean water for two minutes to improve flexibility, then squeeze out the excess water to avoid pooling.
- Wear heavy duty work gloves to prevent direct contact with sharp micro-glass fibers that cause skin irritation.
- Inspect the metal pipes for existing corrosion or surface scale, cleaning the surface with a wire brush prior to wrapping.
The standard specification for wrap overlap is precisely fifty percent, ensuring dual-layer protection across the entire pipe surface. This prevents hot spots and thermal escaping, which can degrade adjacent engine bay electronics. Our garage experience shows that dry basalt wraps do not require pre-wetting and should be pulled under steady mechanical tension to achieve a wrinkle-free layer.
Step 2: Wrapping the Header Pipe with Optimal Overlap
The longevity of exhaust insulation depends heavily on how firmly the initial layers are anchored to the pipe flange. Loose base layers will eventually slide under high vibration, causing thermal leakage and unsightly sagging. Apply high-temperature paint to the header before starting this process to guard against moisture retention under the insulation. Execute these steps with absolute care:
- Anchor the wrap at the top exhaust port flange, completing two full circumferential wraps to establish a solid foundation.
- Pull the insulating band with constant muscular force, keeping the wrap material perfectly straight and aligned.
- Wrap around complex header bends with an overlapping margin of exactly one quarter inch to guarantee complete insulation.
- Secure the loose tail temporarily with temporary spring clamps or vice grips to maintain tension while preparing the metal band.
A primary tip to avoid mistakes is to check the proximity of the fuel lines and starter wires before wrapping. Keeping the wrap tight ensures a smaller outer profile, which prevents dangerous contact with moving suspension linkages or hot engine parts. Ensure that no wrinkles form on the underside of the pipe bends during this stage.
Step 3: Initial Manual Threading of the Metal Zip Tie
Stainless steel ties utilize an internal locking ball bearing that grips the metal tail as it is fed through the lock head. Manual tensioning alone cannot seat this ball bearing tightly enough to withstand heavy motorcycle engine vibrations. Utilizing specialized tooling is required to achieve absolute tightness. Read how to use stainless steel zip ties for deeper theoretical insights on ball-lock mechanisms. Follow these guidelines:
- Feed the flat tail of the 304 stainless steel tie through the self-locking head with the smooth side facing inward.
- Pull the metal strap by hand until it fits snugly against the compressed fiberglass wrap layer.
- Verify that the internal locking ball bearing is properly engaged and not wedged sideways within the locking chamber.
- Locate the metal lock head on the coldest side of the exhaust runner to shield it from direct exhaust gas currents.
Always leave at least two inches of excess metal tail protruding from the locking head. This protruding tail provides the crucial surface area that the mechanical tensioning tool needs to grab and pull. Inspect the locking head visually with your eyes to ensure the strap lies flat without twisting.
Step 4: Inserting and Engaging the Locking Tie Tool
The specialized DEI tool utilizes a slotted cylindrical design that winds the excess steel strap tail around its central shaft. This rotational winding action converts rotational force into linear tension, pulling the tie to extreme tightness. To get the best results, review various exhaust header wrap tool reviews before purchasing hardware. Carry out these steps carefully:
- Slide the excess metal strap tail into the narrow slot of the mechanical tensioning tool body.
- Align the flat face of the tool flush against the locking head of the steel zip tie at a perpendicular ninety-degree angle.
- Engage a five-sixteenths socket wrench or nut driver onto the hex drive end of the tightening tool.
- Stabilize the motorcycle header pipe with one hand to prevent putting excess stress on the soft exhaust gaskets.
Maintain a perfect perpendicular alignment between the tool head and the zip tie locking head. Tilting the tool during winding can cause the metal strap to bend sideways, leading to binding or tearing. Keep the tool straight to ensure the tension force pulls directly along the axis of the strap.
Step 5: Applying Tension and Executing the Flush Cut
Turning the driver rotates the tool shaft, winding the metal strap tightly around the slot and pulling the wrap package together. The final cut must be flush with the lock head to eliminate any protruding sharp metal edges. These sharp edges can act like razors inside a cramped engine bay during routine maintenance. Follow this mechanical process:
- Squeeze or rotate the driver slowly to wind the strap, stopping once the insulation wrap shows a slight compression dimple.
- Increase the tension until the strap reaches approximately forty-five pounds of linear tensile force.
- Activate the tool cutting mechanism or twist the tool ninety degrees to shear the metal strap tail flush.
- Inspect the finished cut with your fingers to ensure no sharp, hazardous burrs remain on the locking head.
Standard quality control requires that the strap must not shift when pushed with moderate finger pressure. If the metal band moves or slides along the pipe, the locking ball bearing did not seat correctly. In this case, you must cut the loose tie off and repeat the process with a fresh fastener.
2. Evaluating the Efficiency of Using a Drill Socket with Locking Tie Tools
Using a power drill with a five-sixteenths socket adapter offers a fast way to tighten exhaust wraps, but it presents serious risks to the hardware. Power tools apply rotational force much faster than hand tools, which can quickly exceed the tensile limits of thin 304 stainless steel bands. If the drill clutch is not set properly, this rapid torque can snap the metal strap or ruin the delicate internal locking ball bearing.
Material Origin & Nature of 304 Stainless Steel
Authentic 304 stainless steel contains approximately eighteen percent chromium and eight percent nickel. This specific alloy ratio creates a highly durable, rust-proof material that resists corrosion even when exposed to road salt spray and high exhaust heat. This steel can withstand temperatures up to one thousand degrees Fahrenheit without losing its structural strength. However, high-speed power drilling generates friction heat that can cause the metal to gall, making the locking ball seize prematurely before reaching full tightness.
Anatomy Breakdown of Locking Tie Tools
To understand how rotary drill attachments interact with locking fasteners, we must analyze the key components of the tensioning system:
- Auto-cutter blade: The hardened tool steel cutting edge designed to shear stainless bands cleanly.
- Cable gripper: The slotted drive shaft that winds the excess steel tail to create leverage.
- Leverage trigger: The manual handle used to apply progressive tension without sudden impacts.
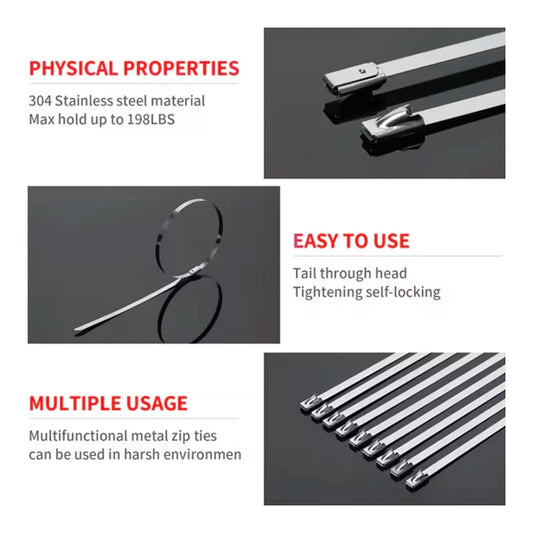
- Steel ball lock: The internal gravity-fed bearing inside the zip tie head that wedges the strap in place.
Operating Principle and Kinetic Limits
The physical physics of a self-locking ratchet system require progressive, controlled tension to allow the ball bearing to seat correctly. Applying torque via a power drill can spin the winding shaft too quickly, preventing the ball from rolling into its locking seat. To prevent this, keep drill speeds below two hundred revolutions per minute and set the clutch to a low sensitivity setting. This precaution prevents sudden shock loads from snapping the metal band at its thinnest point.

Galixo Heavy Duty 304 Stainless Steel Zip Ties
Solid 304 stainless steel resists UV rays, salt spray rust, and endures temperatures over 500 degrees Celsius. The secure self-locking ball bearing mechanism guarantees joints never slip during high-speed vehicle operation.
ABSOLUTE CORROSION RESISTANCE
VIEW PRODUCT DETAILS3. DEI Locking Tie Tool vs Heavy Duty Stainless Steel Cable Tie Guns
Choosing the right tool for securing metal wraps directly affects both installation speed and overall safety. While slotted manual winders are compact and fit easily into tight spaces, they require two hands to operate. In contrast, specialized metal zip tie guns provide a faster, one-handed solution that tensions and cuts the strap in a single squeeze. Understanding these differences helps mechanics select the best tool for their specific project needs.
| Performance Criteria | Galixo Tensioning Gun Solution | DEI Slotted Winder Tool |
|---|---|---|
| Tension Control | Automatic calibrated spring tension | Manual wrench torque feel |
| Operation Method | One-handed ergonomic trigger | Two-handed wrench rotation |
| Cutting Mechanism | Integrated flush-cut blade | Manual twist or external snips |
| Tight Space Access | Excellent slim nose design | Requires room for wrench swing |
| Strap Tail Waste | Zero waste cuts clean at lock | Requires manual trimming afterward |
| Tensile Limit | Saves strap from over-tensioning | Easy to accidentally break the strap |
| Speed Rating | High speed under five seconds | Moderate speed up to one minute |
| Blade Life | Hardened matrix steel resists chipping | No integrated blade to wear out |
Galixo 304 SS vs Nylon Plastic Ties
Nylon plastic zip ties degrade rapidly when exposed to high underhood temperatures, oil grime, and ultraviolet radiation. Within weeks of installation, plastic ties become brittle and snap under the normal vibration of motorcycle exhaust systems. Upgrading to Galixo 304 stainless steel ties provides a permanent solution that easily handles temperatures over five hundred degrees Celsius. This ensures your exhaust wraps stay securely in place for years without drying out, cracking, or losing their grip.
Automatic Zip Tie Gun vs Manual Metal Snips
Using manual metal snips or wire cutters to trim excess stainless steel straps always leaves behind a sharp, angled edge. These sharp metal remains present a serious hazard, easily slicing hands or tearing through delicate engine wiring during maintenance. An automatic zip tie gun solves this safety issue by cutting the metal strap perfectly flush with the locking head. To learn how these tools work, read our detailed guide on how does a cable tie gun work.
4. Preventing and Troubleshooting Ball Lock Slippage Under Extreme Tension
A common frustration during installation is when a stainless steel tie slips backward, losing its tension after being cut. This slippage occurs when the internal ball bearing fails to wedge firmly against the flat strap inside the locking head. Understanding why this happens helps mechanics prevent loose installations and avoid wasting expensive metal fasteners.
Top 5 Fatal Beginner Mistakes
Many installation failures stem from simple errors during preparation or tool use. Avoid these five common mistakes to ensure a secure, long-lasting hold:
- Using cheap diagonal pliers to cut the metal tail, which deforms the lock head and frees the locking ball.
- Applying extreme tension that crushes the soft wrap layers and snaps the internal metal locking band.
- Threading the metal strap tail upside down, preventing the ball bearing from catching the surface.
- Leaving more than a two-millimeter tail protruding, which can catch on engine parts and pull loose.
- Failing to clean oil grease or road grime from the metal band before attempting to tighten it.
Hidden Traps: Low-Grade Metal Warning
Many discount online retailers sell cheap, zinc-plated steel fasteners labeled as authentic 304 stainless steel. These low-grade metals oxidize quickly when exposed to road moisture, weakening the locking head until the ball bearing slips out. Additionally, cheap tensioning tools often use soft carbon steel blades that chip after just a few uses. Investing in genuine, garage-tested hardware protects your projects from these common structural failures.
Tool Unjamming SOP and Maintenance
If a metal strap becomes jammed inside your tensioning tool, do not force the trigger, as this can bend the internal mechanism. Instead, release the tension by backing off the drive screw or opening the bypass lever on your cable tie gun. Use a small screwdriver to gently push the locking ball down, releasing the wedged metal strap. Regular tool care, such as cleaning out debris and lubricating moving parts, prevents these frustrating jams. For more details on choosing the right tools, read our guide on best metal zip tie guns.
5. Locking Tie Tool Alternatives and High-Tensile Specifications
For professional shops and busy garages, finding high-performance alternatives to standard tools is key to staying productive. While basic manual winders work fine for occasional home repairs, they can slow down larger projects. Upgrading to automatic tensioning systems or high-tensile multi-pack kits helps mechanics finish jobs faster while ensuring consistent, professional-grade results every time.
| Size & Length | Breaking Strength (lbs) | Working Temp Range | Recommended Application |
|---|---|---|---|
| 4.6mm x 100mm | 150 lbs | -80C to +538C | Small motorcycle exhaust wrap bands |
| 4.6mm x 200mm | 150 lbs | -80C to +538C | Standard motorcycle exhaust wrap bands |
| 4.6mm x 300mm | 150 lbs | -80C to +538C | Car header insulation pipe wrapping |
| 7.9mm x 200mm | 350 lbs | -80C to +538C | Heavy duty automotive turbo heat shields |
| 7.9mm x 300mm | 350 lbs | -80C to +538C | Heavy duty automotive turbo heat shields |
| 7.9mm x 500mm | 350 lbs | -80C to +538C | Industrial pressure pipe joint bundling |
| 12.0mm x 300mm | 500 lbs | -80C to +538C | Structural agricultural fence reinforcement |
| 12.0mm x 500mm | 500 lbs | -80C to +538C | Structural agricultural fence reinforcement |
| 12.0mm x 800mm | 500 lbs | -80C to +538C | Heavy industrial machinery hose anchoring |
| 16.0mm x 1000mm | 700 lbs | -80C to +538C | Heavy industrial machinery hose anchoring |
Core Specs Analysis
When reading load capacity tables, pay close attention to the width of the metal strap. A wider seven-point-nine-millimeter band offers more than twice the breaking strength of a standard four-point-six-millimeter strap. For high-vibration applications, like motorcycle exhaust wrapping, choose wider bands to prevent premature failure. Proper tensioning with a reliable tool ensures the band locks securely without stretching or deforming. Learn more by reading about manual steel tie tool review choices.
Budget-Based Consulting
For home garage builders working on a single motorcycle header, a basic manual winder tool paired with a hundred-piece zip tie kit is a cost-effective choice. However, professional custom shops and fleet mechanics will benefit from investing in an automatic tensioning gun. This professional tool reduces installation time by seventy percent, helping busy shops complete more jobs in less time. To find the right fit for your garage, check out our guide on compact zip tie guns for tight spaces.
Cost-Per-Use Formula
While high-quality 304 stainless steel fasteners cost more upfront than cheap nylon plastic ties, they save money over time. Cheap plastic ties degrade quickly in hot engine bays, requiring frequent replacement and risking damage to adjacent components. In contrast, durable 304 stainless steel ties last for years under harsh conditions without losing their grip. This long lifespan reduces replacement costs and labor time, making stainless steel the more economical choice in the long run. Discover complete kits by visiting cable tie kits with tool included options.

Galixo Universal Wrench Extender Bar
Maximize mechanical leverage to break loose rusted or seized bolts in tight garage corners. Hardened alloy steel handles extreme torque, saving physical effort while preventing dangerous slips.
MAXIMUM MECHANICAL LEVERAGE
VIEW PRODUCT DETAILSFrequently Asked Questions about How to Use DEI Locking Tie Tool (FAQs)
- How does the mechanical tensioning tool prevent exhaust wrap slippage? - The tool winds the loose metal tail around a slotted drive shaft. This rotational winding action pulls the strap with steady linear force, compressing the wrap fibers tightly and seating the locking ball bearing securely so the band cannot slip.
- Can I use a power drill with a five-sixteenths adapter to speed up installation? - Yes, but you must set the drill clutch to its lowest setting and use a slow speed. Fast drilling can create friction heat that causes the steel to bind, or apply sudden torque that snaps the metal strap.
- Why do my stainless steel ties keep slipping after I trim them? - This usually happens when the internal locking ball bearing fails to wedge tightly against the strap. To prevent this, ensure the strap tail is clean and feed it straight into the locking head without twisting.
- How do I cut the stainless steel ties flush without leaving sharp edges? - Using an automatic zip tie gun with an integrated blade cuts the strap perfectly flush with the locking head. If using manual tools, twist the tensioning tool to shear the metal cleanly and eliminate hazardous sharp burrs.
- Are 304 stainless steel ties worth the extra cost compared to plastic? - Yes. Cheap plastic ties quickly become brittle and break under high engine heat and UV exposure. Solid 304 stainless steel withstands extreme heat and road grime, making it a more reliable and cost-effective choice over time.
Elevate Your Mechanical & DIY Garage Durability with Galixo Store Solutions
Get Professional-Grade Fastening and Durable Hand Tools Today
Upgrade your garage toolset with high-performance equipment designed to handle the toughest automotive, motorcycle, and home repair projects. Galixo Store offers a full line of heavy-duty 304 stainless steel fasteners, automatic tensioning tools, and professional-grade wrench extenders built to last. Our products are engineered for maximum durability, heat resistance, and ease of use, helping you finish projects faster and with total confidence.
Explore our complete selection of professional tools and hardware kits at the official Galixo Store homepage today.
*Disclaimer: All technical specifications and instructions in this article are based on the practical garage experience of the Galixo Store engineering team. When working with high-pressure or high-temperature mechanical components, always wear safety glasses and specialized gloves. Contact us for the most accurate technical consultation.