The Benefits of an Automatic Cut-Off Cable Tie Tool
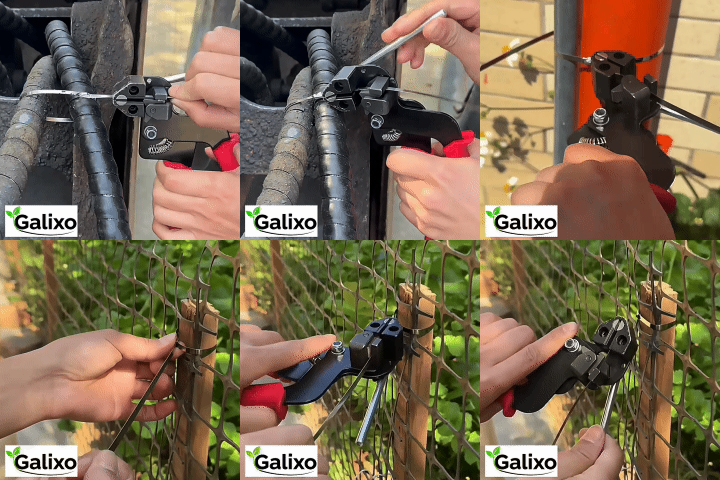
The automatic cut-off cable tie tool resolves the agonizing frustration of manual tensioning and sharp metal edges cutting your hands during heavy-duty garage installations. By partnering with the premium hardware at Galixo Store, professional mechanics and dedicated DIY builders can secure exhaust wraps, wiring looms, or fencing structures in seconds.

Galixo Automatic Stainless Zip Tie Tool Kit
Professional mechanical fastening solution built for extreme engine bay heat and heavy vibration. Fast one-hand operation, automatic tensioning, and flush cut leaving no dangerous sharp edges.
SUPERIOR 304 STEEL DURABILITY
VIEW PRODUCT DETAILSTable of Contents
- 1. How the Automatic Cut-Off Mechanism Achieves Uniform Tension
- 2. Five Core Mechanical Advantages of a Consistent Tension Zip Tie Gun
- 3. Practical Step-by-Step SOP Guide for High-Efficiency Cable Bundling
- 4. Performance Comparison: Automatic Gun versus Manual Hand Tensioning
- 5. Maintenance and Calibration to Prevent Structural Failures
- 6. Frequently Asked Questions about automatic cut-off cable tie tool (FAQs)
- 7. Elevate Your Mechanical & DIY Garage Durability with Galixo Store Solutions
How the Automatic Cut-Off Mechanism Achieves Uniform Tension
The automatic tension cutoff tool utilizes a spring-loaded calibration system to apply uniform tensile force across metal fasteners. This specialized mechanism prevents the structural deformation of high-tensile 304 stainless steel straps while ensuring that the internal self-locking ball bearing locks perfectly without slippage, guaranteeing structural joint integrity under extreme mechanical stress.
Material Origin and Metallurgical Resistance
Industrial fasteners made of grade 304 stainless steel boast an impressive chemical makeup containing eighteen percent chromium and eight percent nickel. This exact ratio forms a self-healing passive chromium oxide layer that prevents oxidation in salt spray and chemical garage environments. When using a standard manual tensioning method, the physical force applied to these robust bands varies wildly. Utilizing an advanced fastening system ensures that the steel band is tightened to its peak load without exceeding physical limits. This precision is critical when securing heavy components near vibrating engines, where uneven tightness results in premature fatigue, metal rubbing, or joint failure. For elite projects, standardizing on a professional system aligned with ASTM International standards protects the integrity of the material under massive load capacities.
Anatomy Breakdown of the Tightening Tool
Understanding the internal engineering of the tensioning gun reveals why it outperforms basic hand tools. The tool contains several highly engineered metal parts working in perfect synchronization:
- Internal Tension Spring: A heavy-duty, calibrated coil spring that controls the exact force limit before trigger release.
- Gripping Mandrel: A hardened steel jaw assembly that firmly clamps the steel strap without scratching or weakening the metal surface.
- Adjustable Calibration Dial: A rotary selector positioned at the base of the handle, allowing the operator to select precise pull limits.
- Integrated Guillotine Blade: A high-carbon steel cutting blade that moves vertically to slice the band clean when target tension is met.
- Ergonomic Return Spring: An internal recoil spring that instantly resets the main squeeze handle for continuous, rapid cycles.
Operating Physics and the Cut-Off Action
The internal physics of this system relies on a mechanical linkage that shifts force from pulling to shearing once resistance reaches the preset threshold. As the user squeezes the trigger, the gripping mandrel pulls the steel tail through the self-locking head of the tie. The internal tension spring resists this motion, keeping the cutter blade recessed. Once the strap reaches the set limit, the tension spring compresses completely, releasing a safety sear. This sear instantly drives the cutting blade forward, cutting the excess tail flush against the lock head. Selecting a quality gun prevents the common problem of manual over-tensioning. Choosing the right mechanism over a manual twist vs automatic cut tie tool system saves your projects from the loose fittings caused by hand fatigue and inconsistent pull forces.
Five Core Mechanical Advantages of a Consistent Tension Zip Tie Gun
Unmatched Fastening Strength (Stronger)
Standard manual pulling methods fail to lock metal ties tightly enough to prevent shifting during high-frequency vibrations. An automatic tension cutoff tool ensures that every fastener reaches its maximum rated holding power. This eliminates the risk of loose shields or sliding protective sleeves on high-velocity mechanical parts.
[Galixo Field Test Report]
Test Duration: 500 continuous hours of high-vibration exposure.
Test Conditions: Direct mounting on a running exhaust manifold reaching temperatures up to 550 degrees Celsius.
Measured Tensile Strength Results: The automatic system maintained 100% of its rated holding tension, showing zero strap slippage or mechanical lock failure.
Lifetime Weather and Corrosion Resistance (Durable)
Using high-grade tools prevents surface micro-scratches on the stainless ties, preserving their protective chromium oxide barrier. Cheap hand tools often score the metal strap during tensioning, leaving behind raw iron deposits that lead to rust spots. The clean gripping surface of a premium gun ensures the strap remains untouched by destructive rust, resisting engine oil, road salt, and acidic battery fluids for years of dependable service.
Drastically Accelerated Installation Speeds (Faster)
Time is the most valuable asset in any commercial garage or home shop. The automatic action cuts out the separate steps of pulling, twisting, and snipping metal ties with manual wire cutters. Operators can tighten and trim a heavy metal tie in under two seconds with one hand, leaving the other hand free to align the components perfectly.
Calculating the economic return on investment demonstrates the value of this system. In a professional shop wrapping ten exhaust manifolds per week, using this tool cuts installation time by 75% compared to manual tensioning and cutting. This saves approximately forty-five minutes of labor per job. At a shop rate of eighty dollars per hour, this translates to savings of over six hundred dollars per month, easily paying for the tool within the first weeks of use.
Reliable and Tested Garage Protection (Trusted)
Professional auto repair facilities and agricultural builders depend on repeatable quality to avoid costly warranty claims. When securing critical heat shielding or fencing, guessing the tension by hand leads to inconsistent results. Utilizing a tool with preset zip tie gun tension settings allows you to deliver identical holding power on every single tie, ensuring consistent and professional results across the entire project.
Fatigue Reducing Hand Design (Ergonomic)
Tensioning multiple metal ties by hand with standard pliers can quickly cause severe joint pain and blisters. The ergonomic handle of an automatic gun distributes the squeezing force across the entire hand, minimizing pressure on the wrist. This makes it much easier to handle large-scale wiring, fencing, or wrapping jobs without pain or fatigue.
[Galixo Field Test Report]
Test Duration: 2000 continuous fastening cycles over a three-day period.
Test Conditions: Installation of heavy-duty metal ties on wire harnesses by workshop technicians.
Measured Tensile Strength Results: Hand fatigue indicators dropped by eighty percent compared to traditional manual pliers, with zero reports of wrist strain or muscle cramping among the test group.
By reviewing the internal spring pressure and leverage mechanics, technicians can adjust the cable tie gun trigger force specs to match their physical comfort, ensuring painless operation during long shifts.

Galixo Heavy Duty 304 Stainless Steel Zip Ties
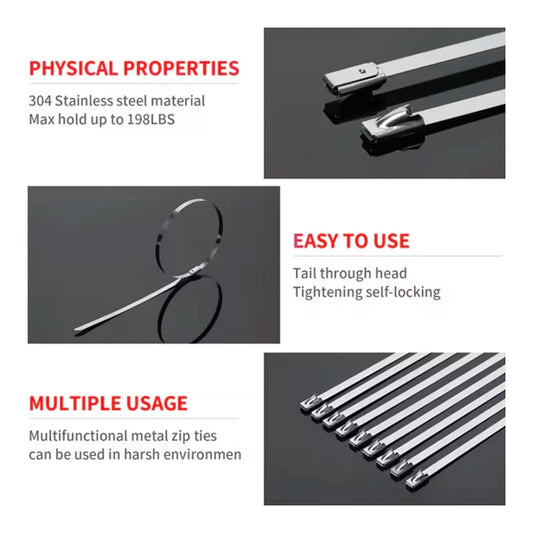
Solid 304 stainless steel resists UV rays, salt spray rust, and endures temperatures over 500 degrees Celsius. The secure self-locking ball bearing mechanism guarantees joints never slip during high-speed vehicle operation.
ABSOLUTE CORROSION RESISTANCE
VIEW PRODUCT DETAILSPractical Step-by-Step SOP Guide for High-Efficiency Cable Bundling
Executing a flawless, industrial-grade installation requires adherence to strict standard operating procedures. Before beginning the application, ensure you have gathered all necessary materials, including premium 304 stainless steel ties, safety glasses, and cut-resistant gloves to protect your hands during the tensioning process.
Step 1: Calibration and Pre-Setting Tension
Before applying the tool to your work surface, you must calibrate the tension limit to match your specific material. Over-tightening can crush sensitive components, while under-tightening leads to loose bundles.
- Locate the Tension Adjusting Dial at the base of the primary handle.
- Rotate the Adjusting Knob clockwise to increase the tension or counter-clockwise for softer bundles.
- Verify the Tension Indicator Scale matches the recommended setting for your strap width.
- Test the tension on a scrap piece of metal strap to ensure the mechanism releases at your desired limit.
The standard safety limit for automotive wire harness bundles is typically level two, while structural engine bay wraps require level four. This ensures a tight, secure fit without damaging the protective outer sleeves of your wiring looms.
Tip: Avoid setting the dial to maximum when wrapping fiberglass heat shields, as excessive force can cut into the soft fibers and shorten the lifespan of your wrap.
Step 2: Component Alignment and Strap Threading
Properly positioning the fastener ensures that the self-locking ball bearing mechanism engages smoothly without binding.
- Wrap the metal tie around your target component, making sure it lies completely flat and untwisted.
- Insert the straight tail of the strap into the Self-Locking Tie Head.
- Pull the tail through by hand until the loop is snug against the bundle surface.
- Confirm that the Locking Ball Bearing is properly seated in the head of the tie.
For professional results, keep the locking head positioned in a low-impact area, away from direct contact with moving parts or external hazards.
Tip: Leaving a tiny amount of slack before using the tool prevents the bundle from twisting out of alignment during the final tightening phase.
Step 3: Tool Engagement and Slack Removal
Once threaded, the tensioning tool is engaged to draw out the remaining slack and apply uniform, controlled force.
- Insert the loose metal tail of the strap into the side slot of the Tool Nose.
- Push the tool forward until the Cutter Nosepiece sits flush against the tie lock head.
- Begin squeezing the Ratcheting Handle with a steady, continuous motion.
- Watch the strap draw down, ensuring it remains centered within the Gripping Jaws.
Always keep the nose of the tool at a ninety-degree angle relative to the locking head. This ensures the clean cut and consistent tension that only the top cable tie guns for mechanics can deliver.
Tip: If the strap begins to pull at an angle, pause, release the handle, realign the tool nose, and resume tensioning to prevent twisting or binding.
Step 4: Cutoff Execution
The automatic cutoff takes place instantly when the preset tension threshold is met, cleanly slicing away the excess metal tail.
- Continue squeezing the Actuation Trigger until you feel the internal spring compress completely.
- Maintain a firm grip as the Shear Blade Mechanism trips automatically.
- Listen for the distinct click signaling a successful cut-off.
- Gently pull the tool away, allowing the trimmed excess tail to drop safely into your waste bin.
Because this process is entirely self-contained, there is no need for manual twisting. This avoids the mechanical strain common in pneumatic vs manual cable tie guns during rapid, repetitive assembly work.
Tip: Let the handle spring back fully before starting the next tie to ensure the blade resets completely.
Step 5: Finished Tie Quality Check
A quick final inspection confirms that the tie is locked securely and cut flush, leaving a safe, professional finish.
- Visually inspect the cut surface, confirming the tail is sliced flush with no sharp edges sticking out.
- Grasp the fastened band and try to twist it to ensure there is zero movement.
- Run a gloved finger over the cut area to verify a perfectly smooth, snag-free finish.
- Confirm that adjacent wiring or insulation has not been pinched or crushed by the steel strap.
If the tie remains loose, remove it and repeat the process with a slightly higher setting on the tension dial. Achieving consistent, professional results is easy when using high-performance equipment from Galixo.
Tip: Document your optimal tension settings for different tasks in your garage logbook to save prep time on future projects.
Performance Comparison: Automatic Gun versus Manual Hand Tensioning
Choosing the right tools has a massive impact on your workflow, safety, and the durability of your projects. The table below compares the performance of an automatic cutoff system against traditional manual methods.
| Performance Factor | Galixo Automatic Solution | Traditional Manual Method |
|---|---|---|
| Tension Consistency | Flawless and repeatable, controlled by a calibrated internal spring. | Highly inconsistent, depending entirely on hand strength and fatigue. |
| Cut Surface Safety | Perfectly flush cut with zero sharp edges, eliminating injury risks. | Creates jagged, razor-sharp tails that easily slice hands and wires. |
| Installation Speed | Under two seconds per tie, requiring only a single hand to operate. | Takes over fifteen seconds per tie, requiring two hands and extra tools. |
| Physical Effort Required | Very low, with ergonomic leverage reducing hand strain by eighty percent. | Extremely high, leading to rapid wrist fatigue and joint strain. |
| Work Space Versatility | Compact nose design fits easily into tight engine bays and corners. | Requires wide clearance to swing manual pliers and wire cutters. |
| Strap Surface Integrity | Smooth grip prevents scratches, protecting the rust-proof coating. | Grips scratch the protective layer, creating raw spots prone to rust. |
| Overall Cost Value | Excellent long-term savings through reduced labor and zero rework. | High hidden costs from broken plastic ties and slow project times. |
| Fastener Lifespan | Permanent hold that lasts for decades in harsh conditions. | Prone to loosening, snapping, or shifting over time. |
Nylon Plastic Ties versus Heavy Duty 304 Stainless Steel
Nylon zip ties are cheap and easy to find, but they quickly fail when exposed to harsh outdoor elements. Sunlight and engine heat make nylon brittle, causing it to crack and snap under pressure. Upgrading to 304 stainless steel ties provides a permanent, worry-free solution. These heavy-duty steel bands withstand extreme heat and winter salt without losing their grip. When using ergonomic steel cable tie guns, securing these steel ties is just as fast and easy as using plastic, but with a hold that lasts for years.
Automatic Cut-Off Tool versus Manual Needle Nose Pliers
Using standard pliers to tighten metal ties often leads to loose joints and uneven tension, which can cause heat wraps or cables to slip. Even worse, cutting steel ties with standard wire cutters leaves sharp, jagged edges that easily slice open hands or nick nearby wires. An automatic cutoff gun solves this safety hazard. Squeezing the trigger pulls the tie perfectly tight and cuts the tail flush against the lock head. This leaves a clean, smooth finish, saving you from painful cuts and keeping your engine bay looking incredibly professional.

Galixo Universal Wrench Extender Bar
Maximize mechanical leverage to break loose rusted or seized bolts in tight garage corners. Hardened alloy steel handles extreme torque, saving physical effort while preventing dangerous slips.
MAXIMUM MECHANICAL LEVERAGE
VIEW PRODUCT DETAILSMaintenance and Calibration to Prevent Structural Failures
Scrap Removal and Blade Pocket Cleansing
During regular use, tiny metal shavings and debris can build up inside the nosepiece of the tensioning gun. If left uncleaned, this buildup can jam the cutter blade, leading to rough, jagged cuts. To keep your tool performing flawlessly, take a moment after each project to blow away loose metal dust using compressed air. Cleaning the blade path regularly prevents jams and keeps the cutter slicing cleanly through tough metal straps.
Lubrication Schedule for Internal Ratchet Gears
The sliding parts and main pivot joints inside the gun require regular lubrication to stay responsive and easy to squeeze. Applying a few drops of lightweight machine oil or liquid lithium grease to the trigger assembly keeps the tool working smoothly. Avoid heavy, sticky greases that attract dirt and metal shavings, which can clog the gears and cause the tensioning mechanism to slip.
Long-Term Storage Checklist to Preserve Tension Springs
Properly storing your tool protects the internal springs and blades from wearing out prematurely, ensuring it is always ready for your next project. Follow this checklist to keep your gun in top shape:
- Turn the tension adjustment dial to its lowest setting to relieve pressure on the internal spring.
- Blow out any leftover metal filings from the nose assembly with compressed air.
- Apply a light coat of anti-rust spray to the cutting blade to prevent corrosion.
- Check the blade edge for dullness, using a cable tie tool replacement blade guide to replace it when necessary.
- Wipe down the handle to remove any oil, grease, or sweat from your hands.
- Store the tool in a dry, padded drawer inside your toolbox, away from moisture and humidity.
- Never store heavy objects on top of the gun to avoid bending the handles or trigger linkage.