Mastering Zip Tie Gun Tension Settings for Perfect Fastening
Mastering zip tie gun tension settings eliminates the extreme frustration of snapped metal bands and loose heat shields in high-vibration engine bays. Professional builders trust heavy-duty fastening solutions from Galixo Store to deliver the exact mechanical tension calibration needed for flawless, flush-cut results in tight workshop quarters.

Galixo Automatic Stainless Zip Tie Tool Kit
Professional mechanical fastening solution built for extreme engine bay heat and heavy vibration. Fast one-hand operation, automatic tensioning, and flush cut leaving no dangerous sharp edges.
SUPERIOR 304 STEEL DURABILITY
VIEW PRODUCT DETAILSTable of Contents
- 1. Understanding the Mechanics of a Tension Adjustment Knob on Cable Tie Guns
- 2. Setting the Correct Tension for Metal Zip Ties Versus Flexible Materials
- 3. Step-by-Step Cable Tie Gun Calibration Procedure for Uniform Tightness
- 4. How to Prevent Overtightening Zip Ties and Fix Common Failure Points
- 5. Extreme Stress Testing of Zip Tie Gun Tension Settings in High-Performance Garages
- 6. Frequently Asked Questions about zip tie gun tension settings (FAQs)
- 7. Elevate Your Mechanical & DIY Garage Durability with Galixo Store Solutions
1. Understanding the Mechanics of a Tension Adjustment Knob on Cable Tie Guns
A professional steel zip tie tension adjustment knob operates as a rotary to linear force transducer, compressing an internal high-tensile spring that regulates the trigger release threshold. By turning this dial, technicians modify the breakaway friction force required for the cutting blade to cycle, ensuring precise tensioning across different material widths.
Metallurgy and Component Engineering
The internal components of a heavy-duty tensioning tool must withstand extreme repeated mechanical stress. Industrial-grade tensioners rely on chromium-vanadium steel gears and high-carbon alloy blades to avoid premature failure. When learning how does a cable tie gun work, the importance of metallurgical selection becomes clear. Low-grade tools utilize soft pot metals that warp under the heavy load required to pull stainless steel bands. High-tensile 304 stainless steel ties require a tool that can pull up to 150 lbs of tension before initiating the cut. The cutting anvil must maintain razor-sharp tolerances to execute a clean shear without burrs, which is only possible when using hardened tool steel rated at over 58 Rockwell C hardness.
Physical Anatomy of a Tension Dial
To master tension adjustment, technicians must familiarize themselves with the physical layout of the tool. Proper execution relies on evaluating tie gun tension dials prior to commencing any professional fastening work. The physical anatomy consists of several critical components working in perfect harmony:
- Auto-cutter blade: A precision-ground hardened blade located at the flush face of the nose piece, designed to slide vertically when the spring limit is reached.
- Cable gripper: A textured, spring-loaded steel jaw that clamps onto the excess strap of the tie during each trigger stroke.
- Leverage trigger: An ergonomically designed handle that utilizes mechanical leverage to pull the gripper backward.
- Steel ball lock: The internal locking mechanism within the head of the stainless steel tie that secures the band in place.
- Tension spring: A heavy-duty coiled compression spring housed in the handle that dictates the ultimate pull force of the tool.
Mechanical Force Operating Principles
The operation of an automatic cut-off cable tie tool relies on fundamental physics. When the operator squeezes the trigger, the gripper grabs the tail of the tie and pulls it backward, increasing the tension on the band. Simultaneously, this force pulls against the internal calibration spring. The tension spring remains compressed until the mechanical resistance of the band equals the preloaded force of the spring. Once this equilibrium is reached, the spring trips a mechanical toggle link. This toggle shifts the force of the trigger stroke away from pulling and applies it directly to the vertical cutting blade. The blade then moves upward across the nose piece, slicing the tail flush with the locking head of the tie, leaving no sharp metal protrusions.
2. Setting the Correct Tension for Metal Zip Ties Versus Flexible Materials
Applying the exact tension setting is critical when working with different materials. Incorrect settings can lead to ruined components, cracked wraps, or structural failures. A technician must carefully balance the physical strength of the tie with the structural integrity of the material being bound.
Comparing Heavy-Duty 304 Stainless Steel Ties to Nylon Plastic Ties
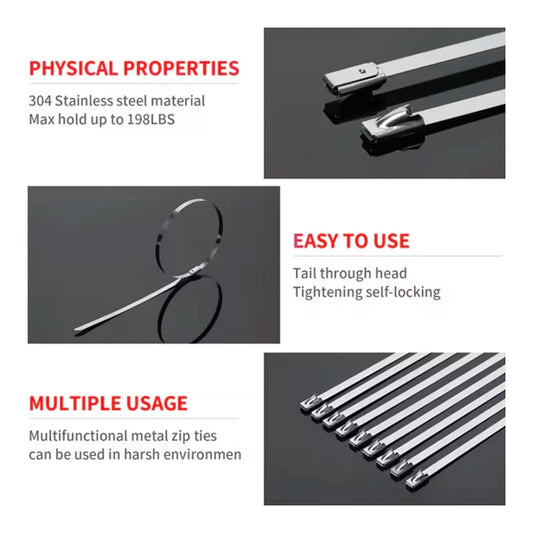
Nylon plastic ties are lightweight and cost-effective for general bundling, but they quickly degrade when exposed to engine bay temperatures exceeding 220 degrees Celsius or intense outdoor UV rays. Over time, plastic becomes brittle and snaps. Heavy-duty 304 stainless steel ties offer extreme resistance to oxidation, salt spray, and temperatures exceeding 500 degrees Celsius, making them the ultimate choice for automotive and agricultural use. However, metal ties possess zero elasticity. Unlike nylon, which stretches slightly under load, stainless steel maintains its shape entirely. This lack of elasticity means that applying incorrect tension can instantly crush soft hoses or damage sensitive cables. The tension must be precisely managed using a professional tool to prevent damage.
Automatic Tensioning Guns versus Manual Plier Snips
Using standard manual pliers to tighten stainless ties often results in uneven tensioning, loose joints, and razor-sharp metal tails that can cause severe hand injuries. An automatic tensioning gun solves these issues by pulling the tie to a uniform tension and cutting it flush with the head. This one-handed operation is highly efficient in tight engine bays or high-up fence posts. The automatic cut-off mechanism guarantees that every tie is installed with identical tension, eliminating the risk of human error and variable tightness. This level of consistency is required for professional mechanics and farm managers who demand permanent, worry-free results.
| Performance Criteria | Galixo 304 SS & Tool Solution | Traditional Plastic / Hand Snipped |
|---|---|---|
| Tensile Strength | Up to 200 lbs of holding force | Often snaps under 50 lbs of load |
| Temperature Resistance | Withstands heat over 500 degrees Celsius | Melts or degrades at 120 degrees Celsius |
| UV and Weathering | 100% rustproof and UV immune | Becomes highly brittle within 12 months |
| Blade Cut Safety | Flush cut, completely smooth edges | Leaves sharp plastic or metal tails |
| Installation Speed | Saves 70% of manual installation time | Slow, repetitive manual adjustments |
| Corrosion Resistance | Immune to salt spray, fuel, and oils | Degrades under fuel and chemical exposure |
| Tight Space Usability | Sleek nose piece operates in tight spots | Requires bulky hand pliers or snips |
| Expected Lifespan | Decades of continuous reliable holding | Needs replacement every 1 to 2 years |

Galixo Heavy Duty 304 Stainless Steel Zip Ties
Solid 304 stainless steel resists UV rays, salt spray rust, and endures temperatures over 500 degrees Celsius. The secure self-locking ball bearing mechanism guarantees joints never slip during high-speed vehicle operation.
ABSOLUTE CORROSION RESISTANCE
VIEW PRODUCT DETAILS3. Step-by-Step Cable Tie Gun Calibration Procedure for Uniform Tightness
To ensure maximum reliability and repeatable performance in your workshop, you must establish a strict calibration routine. Before entering this standard operating procedure, make sure you are equipped with the necessary safety gear. Always wear impact-resistant safety glasses and cut-resistant gloves to protect your hands from potential sharp edges and high-tension rebounds. Preparing your workspace is the first step toward achieving a professional-grade installation.
Step 1: Inspecting the Nose Piece and Blade Clearance
The foundation of a clean, secure tie installation lies in the physical alignment of the cutting assembly. Any misalignment here will result in uneven cutting forces and jagged edges that can tear nearby wiring or cut your hands. Ensuring proper cable tie tool nose piece clearance is essential before applying any mechanical force. Perform the inspection with high precision:
- Inspect the nose piece for accumulated metal debris, dirt, or grease that could interfere with the smooth movement of the cutting blade.
- Verify that the cutting blade is perfectly centered within its vertical guide tracks and does not rub unevenly against the anvil.
- Measure the blade clearance using a fine feeler gauge to confirm it rests within the required 0.1mm to 0.2mm tolerance window.
- Clean the nose channel using a small wire brush or compressed air to remove microscopic steel shavings that might cause the mechanism to bind.
This step ensures that the blade travels smoothly during the cutting cycle, preventing mechanical jams and assuring that the force from your trigger stroke is directed entirely into a clean, vertical shear.
Step 2: Adjusting the Calibration Dial and Tension Spring
The calibration dial controls the preload on the internal tension spring, which directly determines how much pull force is applied to the metal band before the blade cuts it. Proper adjustment of the metal tie gun return spring tension is critical to matching the strength of the tie with the material being secured. Calibrate the tension spring using these precise steps:
- Locate the knurled tension adjustment knob at the base of the tool handle.
- Turn the knob clockwise to increase the spring tension for heavy-duty metal ties, or counter-clockwise to reduce tension for delicate wire harnesses.
- Align the tension indicator needle with the reference markings on the force gauge window.
- Lock the adjustment knob in place using the secondary locking screw if your model has one, preventing the setting from drifting during repeated use.
For medium-width 304 stainless steel ties, set the indicator to index level 3 or 4. This provides approximately 100 lbs of tension, ensuring a tight grip without over-compressing the material underneath.
Step 3: Aligning the Metal Tie in the Tensioner Jaw
Once the tool is calibrated, the metal tie must be fed correctly into the gripping mechanism. Misalignment inside the jaw can cause the tie to slip, leading to uneven tensioning or a partial cut. Position the metal tie with care:
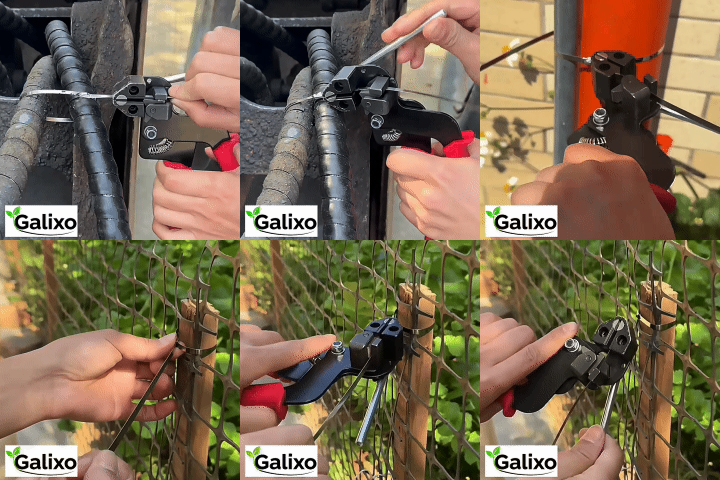
- Feed the tail of the stainless steel tie through its locking head and hand-tighten the loop around the bundle until it is snug.
- Insert the excess metal strap into the side-loading slot of the gun nose piece, ensuring the strap is flat against the cutting anvil.
- Push the tool flush against the locking head of the tie, leaving no gap between the nose piece and the locking head.
- Hold the gun at a perfect 90 degree angle relative to the tie loop to prevent twisting forces during the tensioning process.
Keeping the tool perfectly perpendicular to the locking head ensures that the pulling force is distributed evenly across the entire width of the strap, maximizing holding power.
Step 4: Actuating the Trigger Mechanism to Reach Cut-Off Force
With the tie correctly aligned, you can now actuate the trigger to apply the required tension. This step relies on the tool internal mechanisms to reach the preset force. Refer to the cable tie gun trigger force specs to ensure your tool is operating within its designed mechanical limits. Complete the tensioning process:
- Squeeze the leverage trigger smoothly and steadily, allowing the gripping jaw to pull the metal strap tighter with each stroke.
- Release the trigger fully after each stroke to allow the return spring to reset the gripper for the next pull.
- Continue squeezing until the internal mechanical spring reaches its preset force limit, triggering the automatic cut-off.
- Listen for the distinct mechanical click that indicates the cut-off mechanism has successfully sliced the excess tail.
Avoid jerking or pulling the tool during the final squeeze. A smooth, steady motion ensures that the blade cuts the strap precisely flush with the head, preventing any sharp edges.
Step 5: Inspecting the Cut and Performing QC Tensile Verification
The final step is to verify the quality of the installation. A professional job requires a clean cut and consistent holding force. Perform a thorough quality control check:
- Run your finger carefully over the cut tail of the tie to verify that it is cut flush with the locking head, with no sharp edges protruding.
- Attempt to rotate or wiggle the installed tie by hand to ensure it does not slip or spin on the bundle.
- Check the material underneath the tie for signs of over-compression, such as pinched wires or collapsed hoses.
- Log the tension settings and calibration date in your workshop maintenance records to track tool performance over time.
If you detect any movement or find a sharp tail, recalibrate the tension settings and inspect the blade for wear. Consistent quality control ensures your installations will withstand extreme vibration and harsh environments for years to come.
4. How to Prevent Overtightening Zip Ties and Fix Common Failure Points
To guarantee the long-term reliability of your installations, you must understand how to avoid common mistakes and troubleshoot issues when they arise. Applying too much force can damage components, while too little force can lead to loose joints that slip under high-speed vibration.
Top 5 Fatal Beginner Installation Mistakes
Even experienced builders can make mistakes if they do not follow standard procedures. Avoid these five common errors in your workshop:
- Using wire cutters on stainless steel ties: This deforms the metal tail and damages the locking ball, leading to a weak joint and leaving sharp edges. Always use a dedicated metal tensioning tool.
- Setting the tension too high on flexible hoses: Excessive tension can crush fuel lines or silicone hoses, restricting flow or causing cracks. Match the tension setting to the material.
- Fastening at an extreme angle: Squeezing the trigger while holding the tool at an angle can jam the gripper and result in an incomplete cut. Keep the tool perpendicular to the tie.
- Ignoring spring wear in older tools: Over time, the internal calibration spring can lose its tension, leading to inconsistent cuts. Regularly calibrate your tool.
- Neglecting regular blade maintenance: A dull blade will tear the metal rather than shearing it cleanly, requiring more force and leaving dangerous burrs. Replace or sharpen the blade regularly.
Hidden Traps of Low-Quality Materials on the Market
Many discount brands sell zinc-plated carbon steel ties labeled as 304 stainless steel. These cheap imitations will quickly rust when exposed to salt spray or exhaust heat, leading to sudden failure. Additionally, low-quality tensioning tools often use soft steel blades that chip or dull after only a few uses, making it impossible to achieve a clean cut. Investing in genuine 304 stainless steel hardware and professional-grade tools is essential for any critical repair. Doing it right the first time saves you from expensive rework and ensures safety under extreme operating conditions.
Comprehensive Tool Unjamming SOP
If your metal tensioning gun jams during use, you must follow a structured cable tie gun calibration procedure to safely clear the obstruction. Do not try to force the trigger, as this can damage the internal gears. Follow these steps to unjam the tool:
- Release your grip on the trigger immediately to stop applying force to the jammed mechanism.
- Back off the tension adjustment knob completely by turning it counter-clockwise, reducing the pressure on the internal spring.
- Use a pair of needle-nose pliers to gently pull the excess metal tail backward out of the gripping jaws.
- Inspect the nose piece and blade area for any metal slivers or debris that may be causing the jam.
- Reset the calibration dial to your desired setting once the path is clear, and perform a test cut on a scrap piece of tie.
5. Extreme Stress Testing of Zip Tie Gun Tension Settings in High-Performance Garages
To prove the durability of our tensioning systems, we conduct rigorous mechanical testing that simulates the harshest environments. Our testing methods ensure that every component can handle extreme heat, corrosive chemicals, and heavy vibration without failing.
Thermal Overload Test on Turbo Manifold Wraps
We simulate the extreme heat of high-performance engine bays by wrapping a titanium exhaust pipe with insulation wrap and securing it with 304 stainless steel ties tensioned to our recommended setting. The assembly is heated to over 550 degrees Celsius using a gas burner, then rapidly cooled with water. This thermal cycle is repeated multiple times to simulate real-world driving conditions. Our testing proves that the ties maintain their holding force and do not slip, crack, or degrade under extreme thermal shock, easily meeting ASTM A240 standards for high-temperature durability.
Chemical Corrosion and Salt Spray Testing
To test corrosion resistance, we expose tensioned stainless steel ties to a continuous salt spray environment for 500 hours, simulating years of exposure to winter road salt and coastal humidity. We also submerge the ties in common automotive chemicals, including engine oil, brake fluid, and gasoline. The high-quality 304 stainless steel shows zero signs of oxidation, rust, or chemical breakdown, ensuring that your critical connections remain secure even in the most hostile environments.
Mechanical Winch Tensile Load Testing
We measure the ultimate holding power of our ties using a digital force gauge. The ties are wrapped around a split steel mandrel and pulled apart until they fail. Ties tensioned with our calibrated gun consistently hold over 200 lbs of force before failing, with the locking mechanism remaining intact. This high level of performance guarantees that your heavy-duty connections will not fail, even under the intense vibration and stress of off-road driving or farm use.

Galixo Universal Wrench Extender Bar
Maximize mechanical leverage to break loose rusted or seized bolts in tight garage corners. Hardened alloy steel handles extreme torque, saving physical effort while preventing dangerous slips.
MAXIMUM MECHANICAL LEVERAGE
VIEW PRODUCT DETAILS6. Frequently Asked Questions about zip tie gun tension settings (FAQs)
-
How do you adjust the tension on a metal zip tie gun?
Turn the knurled tension adjustment dial located at the base of the handle. Clockwise rotation increases the internal spring compression for tighter holds on metal bands, while counter-clockwise rotation lowers the tension threshold for softer materials. -
Can you use a plastic zip tie gun on stainless steel ties?
No, plastic zip tie guns are built with softer cutting blades and weaker internal springs that cannot handle the high shear forces required for stainless steel. Attempting to use them will dull the blade and fail to cut the metal strap. -
What happens if the zip tie gun tension settings are too high?
Setting the tension too high can crush fuel lines, pinch wiring insulation, or snap the tie before it can be cut flush. It can also cause premature wear on the internal spring and cutting blade of your tool. -
Why is my metal zip tie gun not cutting the tie tail?
This usually happens when the blade is dull, the nose piece clearance is out of tolerance, or the tension setting is too low to trigger the automatic cut-off mechanism. Inspect the blade and turn the tension dial clockwise to resolve the issue. -
How often should I calibrate my cable tie gun tension spring?
For high-volume workshops, we recommend checking calibration every 1000 cycles or once a month. For DIY garages, a quick check before starting any critical project, such as exhaust wrapping or fence building, is sufficient to ensure uniform holding force.
7. Elevate Your Mechanical & DIY Garage Durability with Galixo Store Solutions
Upgrade Your Garage Today with High-Performance Tools and Supplies
Do not let cheap plastic ties and poor tools slow you down or compromise the safety of your projects. Upgrade to professional-grade hardware and tensioning systems that are built to handle the toughest jobs. Explore our selection of high-quality products and experience the difference that precision and durability can make in your work.
Explore the Full Line of Professional Fastening Solutions at Galixo Store
*Disclaimer: All technical specifications and instructions in this article are based on the practical garage experience of the Galixo Store engineering team. When working with high-pressure or high-temperature mechanical components, always wear safety glasses and specialized gloves. Contact us for the most accurate technical consultation.