Stop the Rattle: Easy Heat Shield Repair
Heat shield repair remains a vital maintenance task that prevents annoying rattling noises and protects sensitive vehicle components from excessive exhaust temperature. This in-depth guide on heat shield repair will help you achieve a permanent fix using professional-grade tools from galixo.store while saving substantial time on labor costs. By mastering the application of stainless steel fasteners, you ensure your car remains safe, quiet, and efficient throughout its operational lifespan on the road today.
Need Help Choosing the Right Fastening Solution? Galixo.store is Ready to Assist 24/7
In just 5 minutes, our expert team can provide a free consultation to find the perfect tool kit for your project.
Why Proper Heat Shield Repair is Crucial? A Direct Impact on Durability and Safety
Using a stainless steel zip tie gun correctly ensures every fastening achieves optimal tension, delivering a professional, safe finish and extending the project lifespan, instead of facing loose ties, dangerous sharp edges, or material damage. When a heat shield becomes loose, the resulting vibration creates a metal-on-metal rattling sound that indicates structural fatigue. Ignoring this issue leads to several technical risks:

- Thermal Damage: Exhaust components reach temperatures exceeding 800 degrees Fahrenheit. A displaced shield allows this heat to radiate toward fuel lines, brake hoses, and electrical wiring.
- Structural Integrity: Constant vibration accelerates the wear on mounting bolts and brackets, potentially causing the entire shield to detach while the vehicle is in motion.
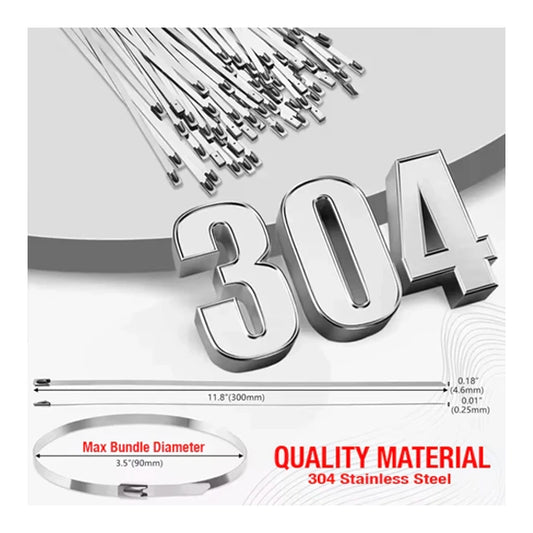
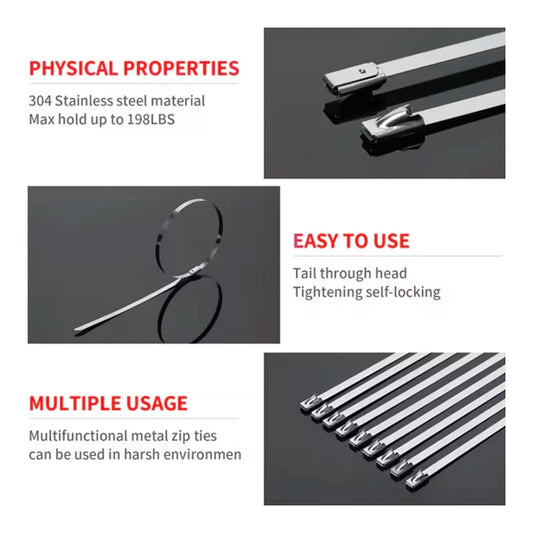
- Professional Result: Utilizing grade 304 stainless steel ties ensures that the repair withstands corrosion from road salt, moisture, and extreme thermal cycling.
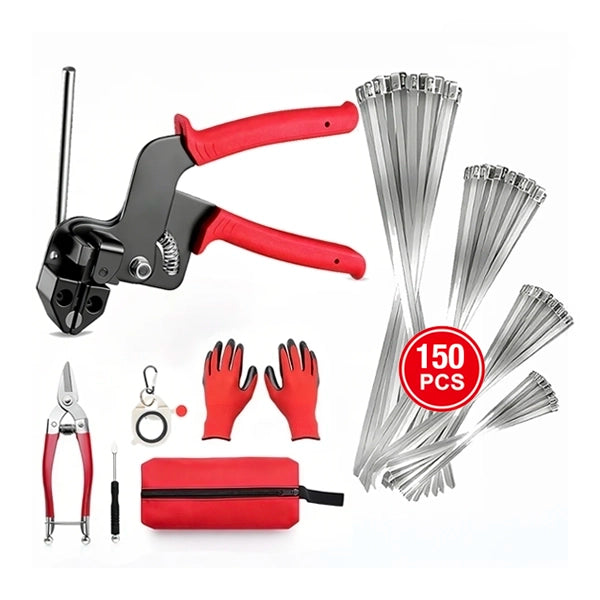
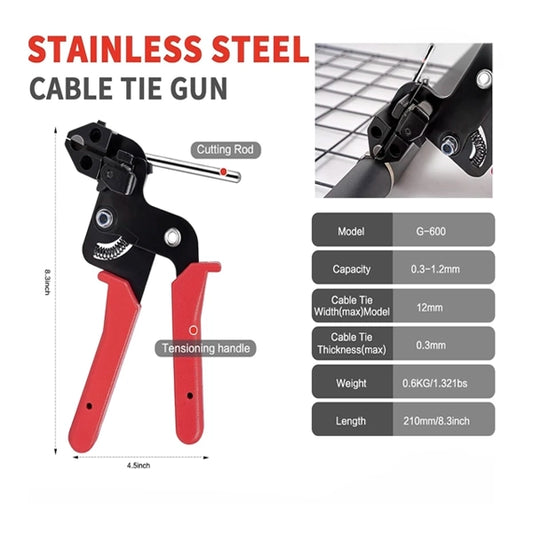
GALIXO Stainless Steel Zip Tie Tool Kit
This all-in-one kit features a professional-grade tensioning gun and 150 heavy-duty 304 stainless steel ties. Perfect for any task requiring a strong, durable, and clean fastening solution. Our team at Galixo store is ready to help you choose the right package for your needs.
A Detailed 3-Step Guide to Heat Shield Repair for Beginners
Repairing a loose thermal barrier requires precision and the right fastening equipment. The following procedure ensures a secure fit that eliminates noise and restores safety. By following these technical steps, any DIY enthusiast can achieve results comparable to a professional mechanical workshop. This process utilizes the mechanical advantage of the tensioning tool to provide a grip that manual pliers cannot replicate. Ensure the vehicle is cool before beginning any work near the exhaust system to prevent burns.

Step 1: Prepare and Thread the Stainless Steel Tie
First, select a tie with the appropriate length and width for your application. Thread the end of the tie through the self-locking head and wrap it around the object. Pull it snug by hand to secure the initial position. It is critical to ensure the tie sits flat against the surface of the heat shield to distribute the 200 lbs of tensile strength evenly across the metal. Inspect the mounting area for rust or debris that might interfere with the grip of the tie.
Step 2: Engage the Tool and Apply Tension
Insert the excess tail of the tie into the front of the tensioning tool. Squeeze the handle repeatedly to tighten. You can adjust the tension control knob to achieve the desired tightness, ensuring a secure hold without damaging the bundled items. For heat shield applications, a mid-to-high tension setting is ideal to prevent future rattling caused by engine vibrations. The ergonomic design of the GALIXO tool allows for high force application without causing hand fatigue during repetitive tasks.
Step 3: Automatically Cut for a Clean Finish
Once the pre-set tension is reached, the tool automatic cut-off mechanism will activate, cleanly severing the excess tie flush with the head. This leaves a smooth, professional finish with no dangerous sharp edges. Traditional methods often leave small metal protrusions that can cut skin or snag on other vehicle components. The built-in cutter ensures that the repair remains safe for future maintenance work under the car. Always verify that the tie head is locked securely before moving to the next fastening point.
Advanced Techniques: Professional Methods for Secure Fastening
Achieving expert-level results requires an understanding of material science and application context. Professional mechanics often use specific strategies to ensure longevity in high-stress environments. These advanced methods go beyond simple installation, focusing on material compatibility and environmental factors that affect mechanical performance. By applying these techniques, you ensure the fastening solution remains effective for the entire life of the vehicle, even in harsh climates or high-performance scenarios.
Choosing Between 304 and 316 Stainless Steel
The 304 stainless steel ties included in the GALIXO kit offer excellent corrosion resistance for most applications. For marine environments or exposure to harsh chemicals, consider upgrading to 316 stainless steel for superior saltwater protection. The 304 grade is the industry standard for automotive use because of its balance of tensile strength and heat resistance. It remains stable at temperatures that would cause plastic ties to melt or become brittle, providing a permanent solution for under-car repairs.
Automotive Applications: Securing Exhaust Wrap and Wiring Looms
In the garage, this tool is essential for securing exhaust heat wrap, which withstands extreme temperatures. It is also perfect for neatly bundling wiring looms in the engine bay, ensuring a secure and tidy setup. When securing heat wrap, use multiple ties spaced approximately two inches apart to maintain consistent thermal insulation. For wiring looms, adjust the tension knob to a lower setting to provide a firm hold without crushing the insulation of the wires, demonstrating the versatility of the tool across different mechanical systems.
Troubleshooting Common Issues with Metal Fastening Tools
Even with high-quality equipment, users may encounter challenges during the installation process. Understanding the solutions to these common problems ensures a smooth workflow and prevents material waste. Most issues arise from improper tool settings or handling techniques rather than mechanical failure. This troubleshooting section provides direct solutions based on years of technical experience with the GALIXO tool kit, helping you resolve difficulties quickly and efficiently.
- Problem: The tool is not cutting the tie after tightening. Solution: You may not have reached the set tension level, or the tension knob is set too low. Try increasing the tension setting or squeezing the handle more times. Also, check the cutting blade for wear or debris that might prevent a clean strike.
- Problem: The zip tie keeps slipping from the tool gripper. Solution: Ensure you are inserting enough of the tie tail into the tool, at least two to three inches. The gripping mechanism needs sufficient material to hold onto during the tensioning process. Clean the tail of the tie to remove any oils or greases.
- Problem: The cut is not flush and leaves a sharp edge. Solution: This can indicate a worn-out cutting blade or an improper angle during the cut. Ensure the tool is held perpendicular to the tie head. While the GALIXO tool is built for thousands of cuts, if you encounter this issue, please contact our support for assistance.
Need Help Choosing the Right Fastening Solution? Galixo.store is Ready to Assist 24/7
In just 5 minutes, our expert team can provide a free consultation to find the perfect tool kit for your project.
Which GALIXO Stainless Zip Tie Tool Kit is Right for You? Expert Advice
Selecting the appropriate package depends on the scale and frequency of your projects. Investing in a quality tool ensures 100 percent of your fastenings are secure and saves significant time. Every kit from Galixo.store includes our 90-Day Guarantee and Free Worldwide Shipping. For starting out with home DIY projects, the Pro Kit, with one gun and 150 ties, is the perfect choice. It provides everything you need to tackle fence repairs, garden projects, or general household fixes. For professional garages or construction crews, our multi-kit packages provide the most economical solution, ensuring every team member is properly equipped for heavy-duty tasks.
| Product Package | Application Scope | Standard Materials | Reference Price (USD) |
|---|---|---|---|
| Pro Kit (1 Kit) | Home DIY, Small Projects | 1 Tensioning Gun, 150 Stainless Ties | $89.00 |
| Most Popular (2 Kits) | Hobbyists, Workshops | 2 Tensioning Guns, 300 Stainless Ties | $142.40 (20% OFF) |
| Best for Teams (3 Kits) | Professional Crews, Garages | 3 Tensioning Guns, 450 Stainless Ties | $186.90 (30% OFF) |
| 100-Pc Refill Pack | For existing tool owners | 100x 304 Stainless Steel Ties | Contact for Pricing |
| Worldwide Shipping | All orders | Global Delivery | Free |
| Guarantee Period | All Product Kits | Customer Satisfaction | 90 Days |
| Customer Support | Technical Guidance | Via WhatsApp/Phone | 24/7 Access |
| Material Quality | Standard Components | 304 Stainless Steel | Certified |
Quick FAQs on Stainless Steel Cable Ties
Commonly asked questions regarding the technical specifications and usage of metal fasteners provide clarity for first-time users. These answers are based on rigorous testing and practical application in automotive and industrial fields. Understanding these parameters helps you select the correct materials and tools for specific environmental challenges, ensuring that your fastening solution remains intact under extreme conditions. For further technical details, our expert support team remains available to assist with specific project requirements.
- What is the maximum temperature for stainless steel zip ties? Standard 304 stainless steel zip ties can typically withstand continuous operating temperatures up to 1000 degrees Fahrenheit and intermittent exposure to temperatures as high as 1600 degrees Fahrenheit, making them ideal for high-heat applications like securing exhaust wrap.
- How do you remove a stainless steel zip tie? Due to their high tensile strength and self-locking mechanism, stainless steel zip ties cannot be unfastened. They must be cut off using heavy-duty diagonal cutters, snips, or a cutting wheel. Always wear safety glasses during the removal process.
- What does a 200 lbs tensile strength mean? This specification indicates that the zip tie can withstand up to 200 pounds of pulling force before structural failure occurs. This heavy-duty capacity is suitable for securing heavy bundles, pipes, and components in demanding industrial or automotive environments.
- Can this tool be used with plastic zip ties? No, the GALIXO tool is specifically designed for metal cable ties. Its tensioning and cutting mechanisms are engineered for the hardness and thickness of stainless steel. Using it with plastic ties could damage the tool and will not provide a clean or secure result.
- Are 304 stainless steel ties magnetic? Grade 304 stainless steel is generally non-magnetic in its raw state. However, the manufacturing process of forming it into a zip tie can induce a slight magnetism. For most practical automotive purposes, it is considered non-magnetic and will not interfere with vehicle electronics.
GALIXO Stainless Steel Zip Tie Tool Kit
This all-in-one kit features a professional-grade tensioning gun and 150 heavy-duty 304 stainless steel ties. Perfect for any task requiring a strong, durable, and clean fastening solution. Our team at Galixo store is ready to help you choose the right package for your needs.
Complete Any Project with Confidence and Professionalism from Galixo.store
At Galixo.store, we deliver a high-quality stainless steel zip tie tool kit that saves you time and ensures professional results. We are committed to durable, easy-to-use products and excellent customer support. Upgrade your toolkit and tackle any job with confidence. Call our support hotline now at +1 813-408-1627 or order directly from our website to get your discount and free shipping!
Disclaimer: The instructions in this article are based on practical experience with GALIXO STORE products. Always follow safety best practices when working with tools. Please contact contact@galixo.store for detailed support regarding your specific application. The guidance and prices in this article are for reference at the time of publishing and are subject to change. Please contact Galixo.store directly for the most current information.